Thursday, February 15, 2018

Irresistible Inking Techniques


You can do so much with ink pads and today I want to touch on just one of those techniques.  I was inspired and selected this technique after working my way through my Altenew Academy classes.  


I decided to use my Altenew Ink pads and my Gel Press / Gelli Plate.  After working through my process I realized that the effect that I was getting really wasn't any different than smooshing the ink pad on a craft mat.  I believe the Gel Press works better with paint/thicker mediums.
Since I was already committed to this process I continued.  

I started by pressing my green ink pads on the plate in a random pattern. 
I selected Altenew Frayed Leaf, Forest Glades, and Evergreen.


I sprayed/misted the ink with water, then I took watercolor paper and pressed it into the ink.

Now you can see that I probably didn't need the Evergreen Ink but I'm going ahead.
I did take another piece of paper after adding more water.

Now I placed the blue ink on the Gel Press.  
Colors are Altenew Dew Drop, Aqualicious and Teal Cave


Spraying with water, I press the watercolor paper into the blue ink.

this is the first inking from the press
I spray more water on the Gel Press and take the second piece of paper and add the blue ink.
this is the second inking from the press

I did use my heat tool to dry the paper in between layers.

After looking at the paper I decided it could use a little shimmer so I spray my Altenew Frayed Leaf Metallic Ink Spray on the Gel Press, misting with a small amount of water, I lay my green/blue inked papers on the Gel Press to add the shimmer.


So, my paper is finished and I want to use Altenew Floral Shadow Stamp set and the Thinking of You die to finish of my card.  I take a couple of stamps and concentrate on the upper corners.  The sentiment die is on the large size and it needed to remain the focal point of the card.  I stamped a few leaf images using Altenew Permanent Black ink and cut the sentiment out of black paper.
I did use 3 stacked sentiments for depth.


I hope you enjoyed this reminder of how you can stretch the use of your ink pads and create fun backgrounds.

Below is a bonus card I made with the additional background paper I had remaining.  I used the same stamp set and added a simple sentiment.


Blessings,

Nancy


Altenew Floral Shadow Stamp Set
Altenew Thinking of You Die
Altenew Inks
Altenew Ink Spray
Gel Press

Wednesday, February 14, 2018

Easy Die Cutting Techniques


Another chapter in my classes today.


I'm doing some Easy Die Cutting today which I would call 'floating die cut.  The concept is similar 
to inlaid die cutting but I actually pop the top layer over the image layer. 


Die cut image from cover layer
Lay stamp in the negative space


Now I stamp the image on paper in preparation of coloring with alcohol markers.


 I used tones of yellows and greens for this image.  


You can see the top layer floats over the base layer which adds dimension.  


To finish the card off I added splatters of metallic ink spray and some scattered sequins.


Thanks for stopping at my blog today.

Blessings,


Nancy


Altenew Stamp & Die - Peony Spray
Altenew Metallic Ink Spray - Frayed Leaf
Altenew Artist Markers


Tuesday, February 13, 2018

Altenew Season Scene Building

I start my project today thinking about how I wanted to interpret this challenge.  
First I need some inspiration, so I turn to my stamp collection from Altenew.
I find a couple of stamp sets that spark my interest and set them aside.
I'm also watching the clock this morning because I need to pack up for the class I'm teaching today at my local scrapbook store.
My clock is silver, black and white, very simple with clean lines and a modern look.
Voila` I have my inspiration.  Now to make my final selection of stamp set.  


I decided this set was perfect


With a monochromatic color palette selected, the challenge of scene building starts out with masking paper and gray inks.

placed all stamps in Misti

Images cut out for masking

I placed all my stamps in my Misti and stamp them on masking paper.  Then I needed to cut them out.  I don't have the die set for this stamp set but I wouldn't want the white edge around them anyway, so I did pick up the scissors and started fussy cutting.


I started by stamping 2 images with the lightest gray ink


Now I need to cover the stamped images with their mask


Choosing a couple of more stamps from the set, they're placed and inked with additional colors. Mask are removed to see the results.


Now I put the mask back over the floral images in preparation of stamping the floral stems


So here's the final layout after stamping the stems and you can see I added one additional flower to the right of the stem. (kinda looks like and olive?)


I finished off my card with a simple background paper, a sentiment and a few sequins.
I love this card and the simplicity.


Thanks for stopping and sharing this exciting journey.


Blessings

Nancy


Altenew Simple Flowers Stamp Set
Altenew Halftone Circles Die (sentiment)
Altenew Rock Collection Ink Mini Cubes
Silver Embossing Powder
MFT-Die-Namics Stitched Rectangles
Misc Sequins
Nuvo Crystal Drops- Ebony Black


Monday, February 12, 2018

Stencil Techniques and Altenew

What a fun project I have for today.  
I will admit that I have quite a few stencils in my collection.  Stencils are so versatile because you can use them for many projects.
I'm not a scrapbooker or much of an altered art person, but I Love, Love making cards so I use my stencils to make paper for card fronts.  I use them with all type of inks, markers and paste.

My card features the Dahlia A & B stencils from Altenew


I also used PINK ink today!


I started by taping my stencil to my paper, I tape on the backside of the paper which allows me to get full stencil coverage.

Stencil A

I used my blending tool and inked the paper with Frosty Pink Ink and Coral Berry Ink.

Stencil B
I now layered the 'B' stencil on the paper and applied a small amount of Ruby Red Ink.


Leaving the stencil in place, I applied Nuvo Glitter Paste.


Note:  when using glitter paste you need to clean
 your tools right away.  I have a plastic container filled with water and a little dish soap that I can place the stencil in until I can clean.  You can use a paper towel or baby wipe to take the major excess product off, but this stuff drys like concrete.


I cut 2 sets of gold letters and 1 set on dark brown letters from the 


 Stacking and gluing them together to add thickness, also off-setting the brown letters to the left which gives a shadow effect. I placed a stamp block over the letters to add weight until they dry.

Below is the finished card and I Love the results.  There is so much sparkle and texture in real life, not sure this picture does the card the justice it deserves.

I've decided that Pink isn't that bad. 


Happy Monday and Have a great week


Blessing,


Nancy


Altenew Dahlia Stencil A & B
Altenew Calligraphy Alpha Die
Altenew Ink - Frosty Pink, Coral Berry, Ruby Red
Nuvo Glitter Paste - Pink Opal

Sunday, February 11, 2018

Let It Shine

Continuing with my classes and assignments for my Altenew Educator Certification, today I will be sharing my card for the Shine project.

Now you can add shine in many ways,
Glitter
Heat Embossing
Foil

I decided to combine several of these for my project.


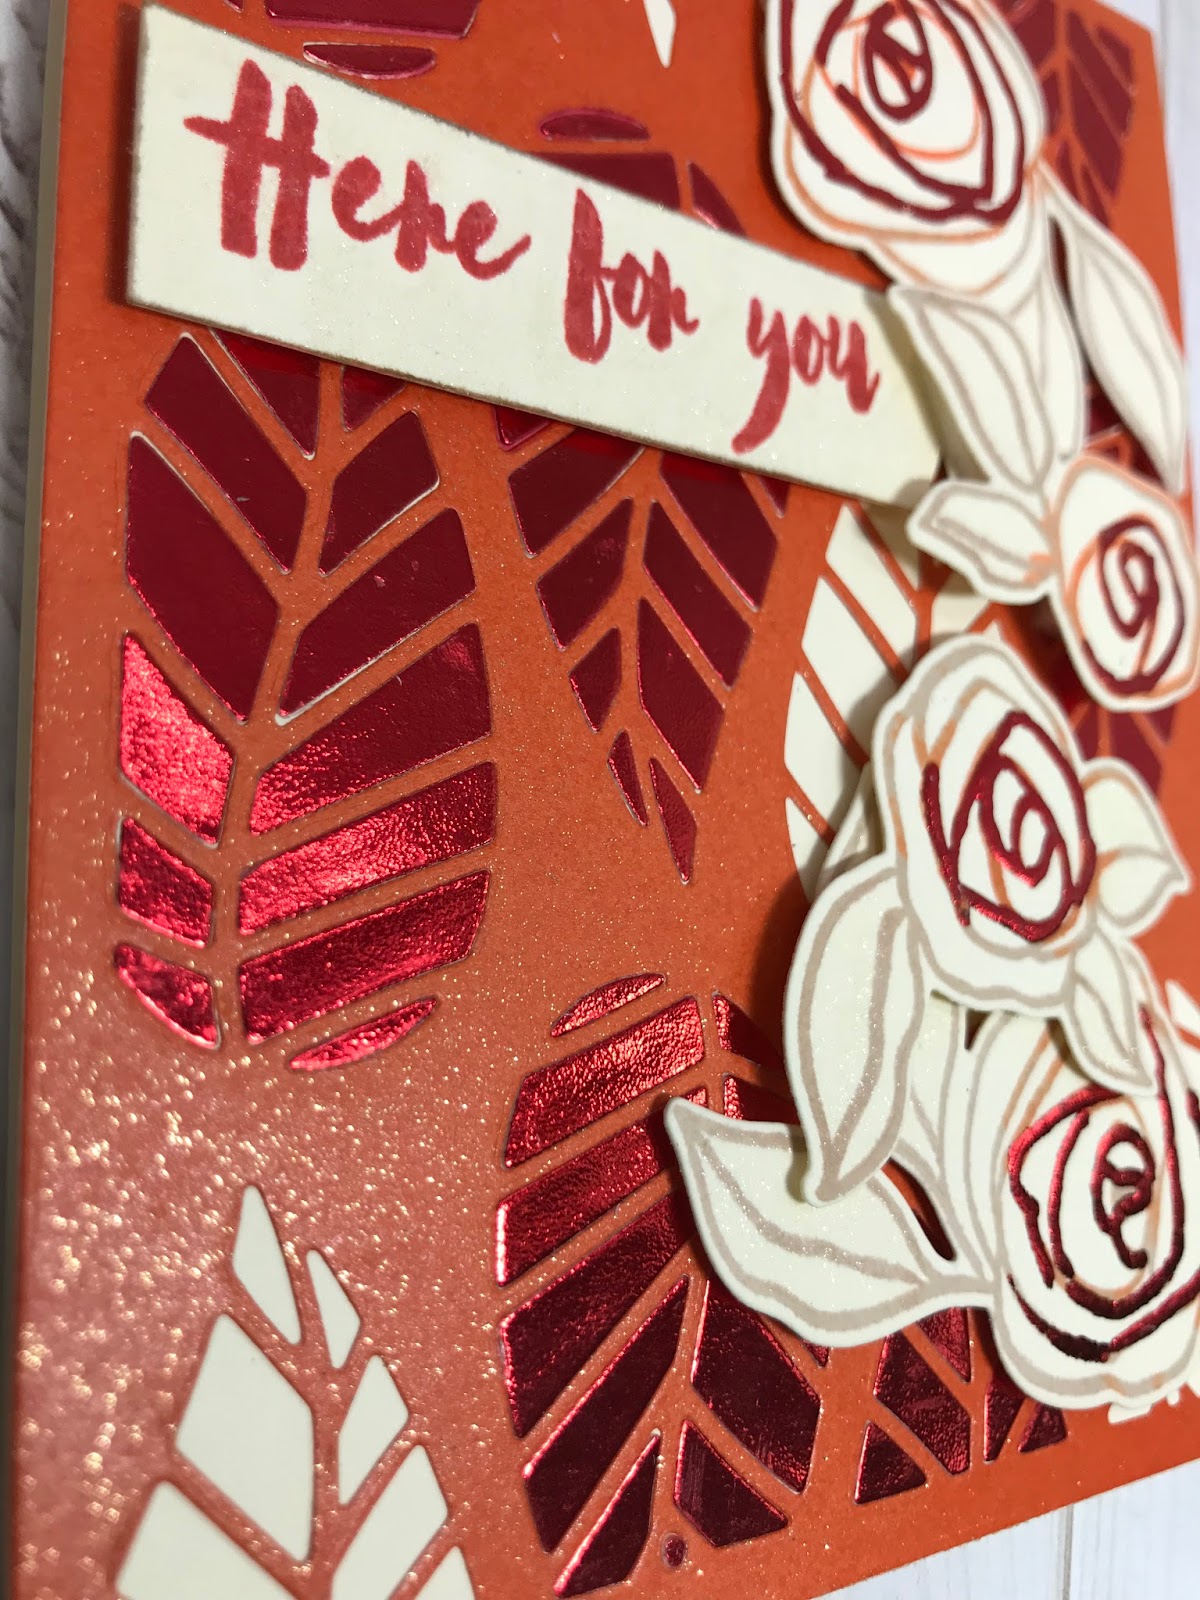
Cover dies are some of my favorites to create with.  They provide many options and 'Wow' factors on your card fronts.   I have used this cover die many times, but decided to do a inlay technique.  Would it have been easier to just layer this over a foil panel, well YES, but then what fun is that. 

First I die cut red foil paper 

Using Press'n seal plastic I secured my die cut pieces.


oops, several pieces came off, no problem

I have another piece of paper that I have die cut out of orange paper and adhered to my card base.  I decided to use a Glitter Dust spray on the orange panel just to add a little sparkle.


Now the fun begins.  I will take the red foil pieces and selectively glue them into the card front panel, just like a puzzle.  This can be somewhat tedious but I love the end result and reward.


When I finished this process I ran the card through my die cut machine just to flatten the pieces and give the card a inlay look for the red foil.

Needing to add something more to the card, I decided to put some flowers on the right side.  It was important to select a flower that coordinates well with the cover die so I selected the Altenew Bamboo Rose set.  This floral image does a great job matching up the floral leaves with the cover die leaves. 


Using Rocky Shores and Autumn Blaze Ink, the images are ready to be die cut.  Needing to combine these flowers with the card I decided to also add some foil accents in the centers.  


I started by using my zig glue pen and covering some of the lines with glue which will prep it for the foil accents.  If you notice in the picture the glue is blue when wet, as it dries it will turn clear.  You want the glue to be 'tacky' to touch with no actual wet glue before you press the foil on the paper.
I used a scrap of red foil and just pressed it on the tacky glue and burnished with my finger.  Remove the foil and you have fun accents.


You can see the Glitter Dust spray, the inlayed foil leaves and the foil accent on flowers


Adding a sentiment from the Bamboo Rose set, my card is finished.
I really enjoyed making this card and will definitely practice this inlay technique more.

Have a Blessed Day!

Nancy


Altenew Stamp & Die Set - Bamboo Rose
Altenew Ink - Autumn Blaze and Rocky Shores
Red DecoFoil
thermoweb Glitter Dust