Showing posts with label Copic Markers. Show all posts

Sunday, May 13, 2018

Happy Birthday

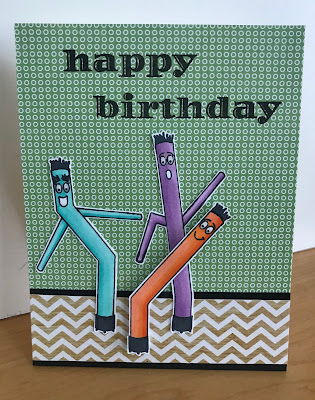
I want to share a simple, quick and fun birthday card that I made for my husband.  I always love these air dancers or tall blow-up men and so I decided to try this stamp set out.
It's the Congrats set from Altenew
Congrats
I pulled some papers from my stash and colored a couple of these guys up with   Copic Markers.

Using the Altenew Birthday Builder set for my sentiment that basically finished the card.
Now if I could just figure out a good way to make these guys move, that would be the best.


Have a Great Day


Nancy

Thursday, May 3, 2018

Play Time With New Stamps

Very seldom do I just get to play around with new stamp sets, but today I decided to fit some time in between the several graduation cards I need to finish.

Starting with the Altenew Happy Heart bundle, I stamped the flowers in two ink colors. 


On the left I used Memento Desert Sand ink and on the right I selected Memento Tuxedo Black.
You can see how different the flowers look.
I colored with Copic Markers and used a few added details to put together these two cards.
My challenge to you is, pick a stamp set and color the images in two totally different ways.


For this next layering set I started with some extra items from past projects and thats what dictated my color choices.  Having the dark green 'thinking of you' die-cut, I decided to use yellow, purple and green.  The background is the pegboard cover die which is becoming a favorite of mine.


Thanks for stopping by today and hopefully I have inspired and sparked your interest with the new Altenew products.


Nancy


Supplies:
Altenew Happy Heart Bundle
Altenew Strength Blooms Bundle
Altenew Gradient Stripes
Altenew Thinking of You Die
Altenew Pegboard Cover Plate
Altenew Inks:Pocket full of Sunshine
                       Shades of Purple
                       Tropical Forest
Copic Markers
Memento Inks: Desert Sand
                         Tuxedo Black

Tuesday, March 27, 2018

Coloring....Sisters, Coloring.... New Friends, Coloring.... Road Trip

Last weekend I traveled to St. Louis for The Daily Marker Road Trip with the multi-talented
Kathy Racoosin.


The local host for the event was non other than, 
Marcella Hawley of Power Poppy.
All I can say is 'WOW,' this lady talented.

I traveled from Iowa and my sister came over from Indianapolis, where we had a fabulous day just coloring and networking with so many talented ladies from the Midwest.

Starting several coloring projects, I finally had the opportunity to finish the card  that I'm sharing today.


This oversized Dahlia is from the Power Poppy collection and has been colored with Copic Markers plus colored pencils for definition.

Thanks for stopping by my blog today.


Blessings,


Nancy


Dahlia

Wednesday, March 21, 2018

Clean, Simple and Colorful Techniques- AECP

As I post my 28th project for my Altenew Educator Certification Program, I can say that I am so stoked to present a card that was inspired by Laura Bassen.  She is so very talented and offers fabulous ideas. 
Please visit her blog and enjoy the entertainment! 


 Laura focused on using the flicking motion with your markers to achieve stunning results on your floral images.
I wanted to make this a colorful card by using yellow, blue and black to make the colors Pop!


Using stencils, embossing, inking, and coloring, this card finished off as being one of my favorites.

If you haven't looked into the Altenew Academy classes, please hop over and check them out.  Great information and it's money well spent.


Thanks for visiting my blog today.


Blessings,


Nancy

Supplies Used:

Copic Markers
Distress Oxide Ink

Saturday, February 17, 2018

AECP Level 1 - Final Project

Over the past couple of weeks I've been working my way through the Altenew Academy classes and the first level for certification.
This week I completed the first level of assigned classes, and now I have my final project to present.
For this assignment I can select any 3 components from the classes and my choice of a Birthday, Graduation or Encouragement theme card. 

The Cotton Comfort Stamp Set was calling my name because I LOVE the sentiments of Encouragement.  
The three components used are Easy Ink Blending, Let it Shine and Irresistible Inking.


I started by stamping several of the cotton pods on Copic friendly paper and I heat embossed with Altenew Platinum Powder
I am very careful when coloring an image with Copics after embossing but I feel it adds so much definition to the image it's worth the chance of having to possibly replacing a marker tip, if needed.

I die cut a panel out of the 

I now do some ink blending on an additional piece of paper using 
Altenew ink colors
Mocha, Espresso and Industrial Diamond


  I've selected a copper foil paper to be the base of my card front, my colored and die cut images are ready, the cover panel with the ink blended paper on the lower bottom (glued to the backside) and I stamped and embossed the 'Prayers' sentiment. 
It's ready to assemble.


Here is my finished card. 
Thanks for joining me on this first part of my journey, now on to Level 2.


Blessings,

Nancy


Supplies:
Altenew - Cotton Comfort Stamp and Die
Altenew Watercolor Stripes Cover Die
Altenew Inks- Mocha, Espresso,Industrial Diamond
VersaMark Ink
Altenew Embossing Powder - Platinum
Copic Markers - E25,E49,E59,E40,E41,E50,W1
Core'dinations Kraft-Core Metallic paper

Friday, February 16, 2018

MFT Die-Namics Collage Cover-up

Having a little fun today.
  
Needing to clean my craft room and put a few things away, I decided to make a card with my new MFT die.  I did see an inspiration video during the MFT release and I wanted to CASE the shaker card.


This was a fun card to make and I hope you will give it a try.


Have a Great weekend.

Blessings,


Nancy

Tuesday, June 27, 2017

Out of the Box Copic Coloring

I want to share a couple of cards from a recent Copic class I taught at 
Scrapmania in Cedar Rapids
The images were printed on Watercolor paper so that I could get a blending effect resembling the succulents.  Also, using unexpected marker colors help to achieve the effect that I wanted.  


Ken Oliver - Poppy Flower  KN-0025


Art Gone Wild - Succulents Bracket Frame AGC3-2829

The Copic Markers used on these cards were:
BV23-BV21-Y04-YG91-BG000-BG11-G20-G40

I hope these will encourage you to step out of the box and use Copic Markers that you normally would'nt think of putting together.

Hope you have a Great Day!!
I'm off to teach a class.


Nancy

Tuesday, June 14, 2016

Where Does The Time Go????

Sorry for the absence, but I have been getting ready for several classes that I am teaching and preparing for everything next month.  I have 1 class down and 4 to go yet this month.
Today I want to share a card that I made using a tag that I'm using for one of my classes.
This month in my Copic Class I will be teaching techniques with colored papers.  We will focus  mostly on krafts and neutral colors, but I may throw a little something, something into the mix.


The paper I used for the tag is Neena Desert Storm and the embossing powder I used is "Wow" Gold Pearl.  I love this Poppy stamp from Hero Arts, as its a fabulous staple in my collection.
If you've never colored on a kraft paper you should give it a try.  You can achieve some unique and beautiful colored images.  A note though, you will need to use darker more saturated colors to get the proper effect.

Thanks for stopping by today.


Blessings, Nancy

Friday, May 27, 2016

Alternative Papers

This past month I've been working on  Copic coloring using alternate papers other than 'white'.
Well today I have a fun tag that I made with a Julie Nutting stamp.  Now most of Julie's stamps are very long or tall.  Difficult to make a card, I decided to make a tag for a gift bag.  
I colored the image on some dictionary paper.  I had fun with this and will do more in the future.


I haven't placed a sentiment on the tag but it will be super easy since the back is blank.

Thanks for stopping by today.


Nancy

Thursday, May 26, 2016

Working on Transparent Objects

I had the pleasure of teaching a Copic Class last night at Scrapmania here in Cedar Rapids.
Our focus for the month of May has been techniques and coloring transparent objects.
After my little craftroom clean-up I uncovered this image that never made it into production.  I had colored it with Copics several months ago and decided now wold be a good time to put something together. I gathered up some scrap papers and her ya go.


This cute little fairy in the glass shows the shadow of the glass making it have that transparent look. 
Of course this image was screaming Shaker Card!

Just a reminder, I will be teaching one more class this month at Scrapmania,so if you're in Cedar Rapids and want to take a Copic Marker class just call sign up.
The class is Sunday, May 29th starting at 1:00
319-377-9999

Thanks for stopping by,

Nancy

Tuesday, May 24, 2016

Copic and Foil Flowers

So I needed to do a little desk cleaning today before I head out for my Copic Class at Scrapmania.  Many of you know that one of my favorite things to do is make cards out of all the scrap laying around.  I have been playing around with Deco Foil and how it reacts with Copics.  
I found that they do play well together and I will be experimenting more very soon.
The image is from my digital stash and printed on a laser printer.  
I used a  laminator to adhere the foil


This is the front of the card using some simple circles and gems to add the finishing touches


I tried to take a close-up so you could see the shine on the foil.

Thanks for stopping by today.

Nancy

Saturday, May 21, 2016

Hey Culligan Man!

Okay, so you're probably thinking I'm crazy.... but today I had to wait for the Culligan Man to come deliver salt and I thought what a better way for me to use my time than to color something fun.
I selected this stamp from Hampton Art that allows me to do one of my favorite techniques.


I love using these types of stamps that have background areas I can color using a solid gray tone.  I wanted to practice using some vibrant colors that would stand out from the gray.
You can also see that I didn't get a perfect blend between my colors. As I try to continue to step out of the box and use colors that are NOT in a natural Copic blending group, I find you can get fabulous results even though the coloring is not perfect.  
I matted my colored piece several times using fun foam and kept this card simple.
Listed below are my color combo's


Y02                    G00                 E51               RV02              RV0000                YG23
RV06                  BG02              BV00            RV04              BV02
Y38                    BG49              E11                RV06              B23                       W5


Thanks for stopping by today.


Nancy

Wednesday, May 18, 2016

Copic Marker Class

I've been asked to by a Guest Teacher at the local scrapbook store here in Cedar Rapids for the month of May ans June.  I've decided to focus on basic techniques and transparent objects.  If you know anything about Copic markers, there seems to be a Huge shortage everywhere.  One of the things I want to focus on with this May class is to use the markers you already have in your collection.  We will step out of the box with some techniques and also step away from the basic blending groups we have all been taught.
I will have two class offerings at Scrapmania here in Cedar Rapids.
Wednesday, May 24th 6-8pm
Sunday, May 29th 1-3pm

Space is still available so please call and reserve your place for this class.
319-377-9999

Here's a short introduction video preview for the class.


Thanks for stopping by today.


Nancy

Sunday, May 1, 2016

Watercolor Look With Copic Markers

You are probably seeing a trend with my cards the past two days, but todays Power Poppy image was colored on watercolor paper with Copic Markers.  Once again I created the background around the image and them added texture with various fabric.  
I then colored the image as usual.
I hope you enjoy.


I hope you've had a great weekend and its not as chilly and rainy where you are.

Blessings, Nancy

Saturday, April 30, 2016

Copic Butterflies

After taking a break from my blog,  I've got a couple of cards to share with you today.  I've chosen to feature an older stamp from my stash.  This is a rubber stamp from Memory Box.  
Lately I've looked at my inventory of stamps and images and have decided to really start using what I have instead of purchasing so many new things.  It's been refreshing to look at my images and re-invent them into new designs.  
I like trying new techniques and also it's fun to just color with no purpose other than enjoyment.
I've used the same basic techniques with these two cards by coloring the background and then using a texture technique with Copic Colorless Blender and a piece of terry cloth.


I hope these two cards inspire you to show those old stamps some love and create something just for fun.

Thanks for stopping by today.

Blessings, Nancy

Wednesday, November 18, 2015

Elf'n around

Have you ever lost a digital image in your computer?  I feel almost certain it should be there, but I just can't find it.  I know it will show up after the project has been completed and its not  needed anymore.  So while I was looking at every image, and I mean every image stored on my PC, I came across these cute little Elf images. I hadn't planned on coloring them all today, but since all those red and green markers were laying on my desk, I just kept going.  I had alot of fun and also got to practice on coloring those reds.
So here's what I did today...

Using Copic Markers, Wink of Stella and a little flower soft on the Elf's hat

Front of card using a circle window to get a sneak peek at the Elf inside

Fun Elf on the inside

This little elf is so cute with his holiday garland.

Thanks for stopping by today.

Nancy

Tuesday, November 17, 2015

I Love Power Poppy

What a great weekend at the Indiana Paper Art Gathering.
I had the opportunity to visit with my sister and meet many new friends. 
Catching up on some of my coloring and practicing new techniques, its was also time for a Power Poppy release.
The digital image below is
Partridge in the Pear Tree

Using Copic Markers, I selected basic holiday colors and used a simple layering technique for my card.

  I want to thank you for stopping by today and wish you a Blessed Day

Nancy

Friday, July 24, 2015

Molli All Glamed Up

So here's another Molli image that I wanted to share.
This is 'Night Out Molli '


 I used Copic Markers to color the image after I selected my papers from the BasicGrey "Hey Girl!' paper pad.  I haven't been using much ribbon lately, so I decided to keep the finished card somewhat simple and then adding bling with her earrings, necklace and shoes.
I selected an all occasion sentiment so this one will go in my stash.  
Thanks for stopping by today.

Nancy 

Tuesday, June 30, 2015

Playing With Paper Dolls

I've been walking by these stamps by Julie Nutting at my local scrapbook store and really never gave them much thought.  This designer has a couple of sets of accessories to go with these paper dolls that I picked up to go with my Tim Holtz Bird Crazy stamps.  So, I caved and purchased one to give it a try.  Most of what I have seen with these stamps revolve around paper piecing for the clothes and hats.  I decided to use my Copics for the coloring and then paper piece the girls hat.


The stamp has the girl holding the flowers on the left side but I cut them off and then stamped several more bunches and put them in the bucket, added a little hemp cord bow and its done.

Stamps sets used:
Julie Nutting "keira"
Julie Nutting 'hats #2"

Thanks for stopping by today and I hope you enjoy.

Nancy

Tuesday, June 16, 2015

It's a "Do Over"

If you've been following me for a couple of day since I started my blog back up, you have seen my new love for watercolor.  I decided to 'do over' some of my old images that are colored using Copic Markers and see what they look like in watercolor.

This first card was done a couple of years ago with Copic Markers.  As you can see I stayed more with a strong orange color   I have many more Copic's to choose from, so its more vibrant.


This second card was the 'do over' with Zig Clean Color Real Brush Pens.  I have worked very hard to try and make my coloring more like watercolor instead of all the blending I do with Copic.  Once again these Zig pens are strong colors and I have found I need to use more water than I would think.


This has been a fun trial for me and I promise to share more.

Thanks for stopping by today.

Nancy